The Modern Development Process for Medical Illustration
The first question I get when I tell people that I’m a medical illustrator is “What is that?” Once I’ve explained what I do, the inevitable follow-up question is..
“So the computer does it all for you, right?”
No, absolutely not.
While technology has made certain aspects of creating art easier, mostly what it offers contemporary artists is time and space-saving advances. Artists no longer have to warehouse, manage and maintain a huge studio filled to the brim with reference material, art supplies and the tools and materials needed to make commercial art “camera ready” or ready to go to press. Our computers offer us software that enable us to emulate a variety of media; oil paint, watercolors, airbrush, collage, pen & ink, and clay, we don’t have to hand-set typography or light and photograph our finished artwork (which is an art in and of itself) for publishers to be able to use – all of these things can be done on a desktop. Another huge perk of using the computer over traditional media is the ability to ‘undo’ some of your work during the development process without changing or destroying the work you’re happy with. This is far more quickly and easily done using modern software than it is with traditional media. As commercial artists, we have a lot to be thankful for in regards to the computer as a tool, but it doesn’t obviate the basic drawing and compositional skills required to create a captivating piece of art that has beauty and engages the intended audience.
As for me, I’ll share my development process below and you can see how an illustration goes from concept to completion.
Step 1 – Nailing down the concept.
This phase usually entails multiple conversations (either in person, via email or phone) with the client to determine what they want shown in the figure and what the key points and areas of emphasis are. Additionally, I am doing research on my end to familiarize myself with the procedure and involved anatomy. I always ask for any available reference material from my clients (which they almost always provide) as this really helps me get up to speed on understanding what they want shown. These references can be in a variety of forms, ranging from sketches from the client, photographs, video, manuscripts, publications, books, links to websites, etc.
At the end of this step I’ll have a short written summary for each figure that will detail;
- What view or angle the figure will show (AP, inferior oblique, sagittal, etc.)
- How the figure will be rendered (color, B&W, monotone, line, tone, schematic, representational, etc.)
- Description of areas of focus or emphasis.
- If there’s an inset image and what it will show.
- Where and how the figures will be used (so I can format the files per publisher’s specification).
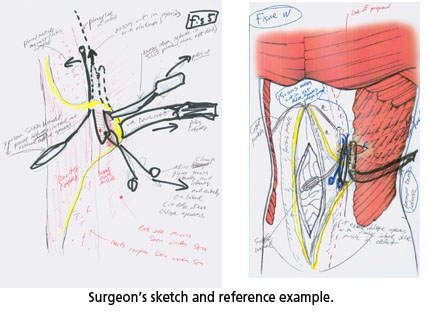
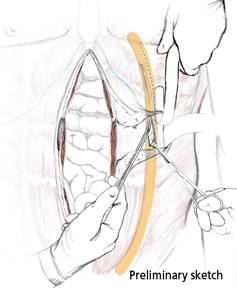
Step 2 – Preliminary sketches.
Once I have a good idea of what’s required for each figure I sit down surrounded by my references and start sketching. Most of the time I sketch at my drafting table with a mechanical pencil and paper, but occasionally I’ll sit at the computer and sketch using my Wacom tablet. Either way, these drawings are pretty rough, mainly demonstrating the composition through line drawing with little texture or tone shown. Line drawings at this phase are fairly easy to change, which is an important feature until you nail down your composition. Once the preliminary sketches are done they are sent to the client for review.
Step 3 – Revisions.
The preliminary sketches are a jumping off point for client/illustrator dialog and inevitably there are revisions to be made… which is critical in refining the composition. Developing a strong composition that captures all of the key points the figure needs to convey is key to a successful illustration. Typically there are one to two rounds of revisions. Key to limiting the number of revisions is having defined and agreed upon the scope of each figure in Phase 1.
My example below differs from most of my revisions in that it has already had color, full tone and texture applied. Most revisions are line drawings with little tone or color.

Step 4 – Final rendering.
Now for the parts we’ve all been waiting for (drum roll here please)… COLOR, TONE & TEXTURE!!!!
Elements like color, tone and texture are usually developed in this last phase, but only once the composition has been finalized. Their development is held to the end as they are far more involved, require much more time and are far more difficult to change and move around once they are developed. For me, they are usually generated in the following order.. tone, color then texture. That said there’s a lot of back and forth work done as I notice areas that can be improved upon as I work. As I mentioned before, the computer does not ‘do’ the work for me, over the years I have developed my own custom color palettes and Photoshop brushes for creating complex textures that give my illustrations a more organic and natural appearance over the more ‘plastic’ and angular look of some computer generated illustrations.
Once completed, the figures are sent back to the client for a final review and sign off. Occasionally, the client will ask for some minor modifications to be made (like label changes) and I’ll make those before sending the finalized files.

Step 5 – The wrap up.
Once the final files have been approved I send the files electronically, either through a FTP site (with Dropbox being my current site of preference) or through email, depending on the size of the files. In addition, I send the client a package through the mail which contains printed copies of the figures (archival quality), two duplicate CDs which contain the illustration files and some supporting project files, a signed permissions letter for the publisher (for editorial work), a project specifications sheet and a copy of the final invoice.
Recent Comments